
If you want to track your sales from Facebook and/or Instagram back to the Meta Ads Manager, then follow this quick tutorial and let SamCart do all the heavy lifting.
When you invest money in advertising, you need to know exactly how many revenue those ads generated. With SamCart's Meta Pixel integration, you can track your Return on Ad Spend (aka "ROAS") down to the dollar. So you know exactly when to scale up what you're spending and acquire more customers.
Add Your Meta Pixel ID and Access Token to SamCart
To get started, navigate to your marketplace settings by clicking on the blue person icon in the top right corner of your dashboard and select Settings from the dropdown menu:

Note - if you have a marketplace logo set, you will see your logo instead of the blue person icon.
Next, click on the Tracking and Pixels tab and locate the Meta Pixel tracking toggle. Turn this toggle to the "on" position:

Paste your Meta Pixel ID in the space provided. Your Meta Pixel ID is usually 15-16 characters, and comprised of numbers only. If you need help creating a Meta Pixel, or finding your Meta Pixel ID, visit this help article from Meta.
After your Pixel ID is pasted in, click Save Changes at the top of the page.
Once you have successfully added your Meta Pixel ID, you will need to add your Access Token as well. To start, make sure that you have your Pixel ID copied as you will need it to generate your access token! Next, within the Meta Events Manager in the existing Meta Pixel go to Settings tab again, and scroll down to the Conversions API section.
Click Generate access token to expose a one-time access token for the API.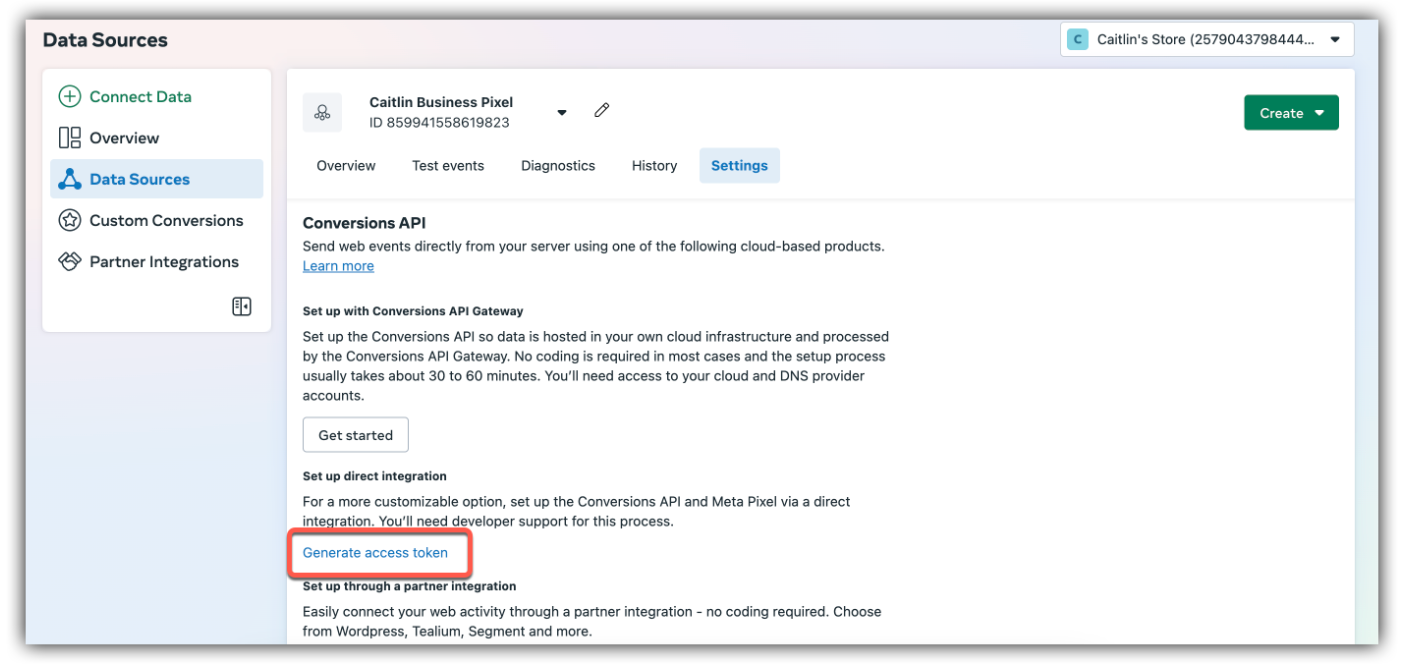
You will see something like the screen below - click the box to copy the code.  Now head back to your SamCart Marketplace Settings by clicking the Settings button in your lefthand marketplace navigation bar. Once within your Marketplace Settings, click on the Tracking and Pixels tab (you should already have the Meta Pixel Tracking toggled "on," and your Pixel ID entered). Now you can paste the Access Token you copied from Meta into the Access Token box!

Click the Save Changes button in the top right corner, and you're done! You should see the success popup at the bottom of your screen. You now have both your Meta Pixel ID and Access Token saved in SamCart, and you're ready to start tracking purchases with Meta!
Firing Events Back To Meta
Once your Meta Pixel is saved, SamCart will automatically populate it onto every checkout you create. SamCart fires a few different standard events back to Meta, which you can use to track how your ad campaigns are performing. Here are the list of events SamCart will fire as your users checkout...
- Page View: Each time a visitor loads a checkout, or an upsell page, this event will fire.
- Add Payment Info: When a user submits their order, but before the charge is successful, this event will fire.
- Purchase: When a customer's credit card is charged, this event will fire. This means that throughout a single order, multiple purchase events could potentially fire (depending on whether you are offering One Click Upsells or not).
The most important event for your tracking is Purchase. Each time your customer's card is charged, SamCart will fire a Purchase event back to Meta. SamCart includes metadata with each event that will tell Meta additional information.

- The SamCart product ID(s) of any product included in the charge
- The name of the original product the customer bought
- The quantity of each item purchased
- The total charge amount (which does reflect any discounts from coupons the customer might have used)
If you are using One Click Upsells after checkout, a separate purchase event will fire for each upsell a customer buys. Upsell purchase events will only include products and revenue.
Testing Your Meta Pixel
If you would like to test your Meta Pixel to see these events, we recommend downloading the Meta Pixel Helper Chrome Plugin. After installing and activating that plugin, you can load any SamCart checkout and see the events firing as you place your order. You can also see the metadata SamCart sends back to Meta in real time.
The Meta Pixel Helper is what you are seeing in the screenshots above.
Alternatively, you can test your Meta pixel by using the testing events tool inside of your Meta Events Manager. Simply plug in the URL to your SamCart checkout or landing page where you have embedded a SamCart Checkout. Meta will open that page in a new tab, place an order yourself, and then go back to the Meta Events Manager to see each of the different events SamCart has sent back to Meta (like the example below).

Remove Any Duplicate Pixels
If you have your Meta Pixel embedded in the footer or header of your SamCart pages, you should remove those pixels to avoid any duplicative information being sent to Meta. There are two places to check for extra Meta pixels you may have embedded on your checkouts.
First, head to your Marketplace Settings and click on the Tracking & Pixels tab. Check for any Meta Pixel in the Embed HTML/Scripts In Header or Embed HTML/Scripts In Footer boxes. If you have turned on the Meta Pixel tracking from the beginning of this article, these two boxes do not need your Meta Pixel script.

Next, you'll want to check your products' Advanced Settings tabs. There are three similar boxes where you could embed custom scripts. Your Meta Pixel script should not be included in the Embed HTML/Scripts In Header, Embed HTML/Scripts In Footer or Fire pixels/scripts after an order is completed boxes if you have turned on the Meta Pixel tracking outlined in this article. While you may have other scripts included in these boxes, there is no need for your Meta Pixel to be included.

Important Setting for External Thank You Pages
If you are sending customers to an external thank you page (aka not using SamCart's Order Summary Page), make sure you set the Fire Pixels Before Redirect toggle shown below on. This toggle is found in your Tracking & Pixels settings where you added your Meta Pixel.

Fire Pixels Before Redirect must be toggled on if you are sending customers to your own thank you page. This toggle ensures that sales made from your final one click upsell are tracked before the user is redirected away from SamCart to your own thank you page.
Troubleshooting
Problem: I do not see the Meta Pixel when I load a SamCart checkout.
Solution: Make sure you do not have any ad blockers running on your browser. Ad blockers can prevent Meta Pixels from being rendered on a page.
Problem: My sales are being reported twice in my ads dashboard.
Solution: Make sure you have removed all Meta Pixels and event tracking from the embed boxes in your Marketplace Settings, and in each of your product's settings (see the Remove Any Duplicate Pixels section of this article).
Frequently Asked Questions
Q: I see an integration with Facebook (Meta) in the Apps section of my marketplace that I don't remember setting up - what is this?
A: Great question - this is something that happens automatically when you set up your Meta tracking, specifically when you enter the access token! When you enter the Meta access token within SamCart, it automatically creates an integration with Meta to help track as accurately as possible. There are two rules that are automatically created, they will look like this:

This is also helpful because whenever a purchase occurs and this connection fires, you can go to the Logs section within the Facebook connection in your SamCart App Marketplace to see that purchase set over to Meta. Note - the Action may sometimes show as "Send a POST for the specified trigger" rather than "Track conversion event." This is correct!

Q: Does this replace the need to have my Meta Pixel embedded in the Header/Footer? What about conversion events script in my products' advanced settings?
A: Yes! With this integration active, you can remove any Meta Pixels you have embedded in your Marketplace Settings. You also no longer need any pixels with conversions events added to your product's "Fire Pixels/Scripts After Order Is Completed" box under Advanced Settings. This integration will fire events back to Meta for all products after.
Q: Will the purchase events account for coupons?
A: Yes, any discount from a coupon will be reflected in the order value SamCart sends back to Meta.
Q: Will any extra revenue from order bumps, upsells, or upgrades be sent back to Meta?
A: Yes again. No matter what combination of products your customers end up purchasing, SamCart will send the correct order value back to Meta. SamCart also includes metadata in the purchase events that include the products' SamCart Order ID.
Q: Can I use multiple Meta Pixels?
A: Each Marketplace allows for one Meta Pixel to be added. However you could use the Embed Scripts boxes shown above to manually enter Meta Pixels and track events for additional pixels.
Q: How do I verify my domain within Facebook?
A: You may wish to verify your SamCart subdomain inside of the Meta Ads Dashboard. This is an optional step, but follow these directions to make it happen...
First, you need to set up your own SamCart Custom Domain.
You now need to verify your domain using Facebook’s DNS Verification process, which will require you to put a TXT file in your DNS settings in your domain registrar.
This process requires the verification script from Facebook!
Here is how you will want to correctly grab that script:
- Navigate to your Meta/Facebook Business Setting's Brand Safety drop-down menu, and click on Domains
- Click the Add button and type in your root domain (ex: yourwebsite.com)
- Make sure that you have the Update the DNS TXT record with your domain registrar option selected
- You can now find the verification script to add this TXT record in your DNS hosting provider

Once you log into your domain registrar, you will need to navigate to the domain you’re trying to verify. Then you will want to:
- Go to the screen within your domain registrar where you can manage this domain's DNS records
- Add a TXT record
- Type the @ symbol into the Name/Host field
- Paste the verification script from Facebook (as explained above) into the Answer/Content field (i.e. “facebook-domain-verification=xxxxxxxxxxxxxx”)
- Click Save
This record will look something like the following:
After a few minutes, you can go back to Facebook and verify the domain by clicking the green Verify button!
This will allow that domain to appear under Facebook's Web Event Configurations page, enabling you to assign up to 8 Facebook ad conversion events that your ads can be optimized towards.